Some of the most frequently asked questions we get here at Wood Finishes Direct are about wood colour. From the shade of a fruit bowl to the colour of a mile long fence, sheds and other wooden fixtures including furniture, floors, doors and more.
It’s simple right? You have your new or freshly sanded floor or piece of wooden furniture, you choose the clear or coloured stain, varnish or wood oil you like – job done! If only it were that simple…
Wood is unique. It’s unlike almost any other type of surface or as some would say, substrate. Why? Wood is a natural organism and although it could be said that a tree is a tree, it could also be said that a person is a person and therefore shouldn’t be any different to anyone else.

Trees are complex
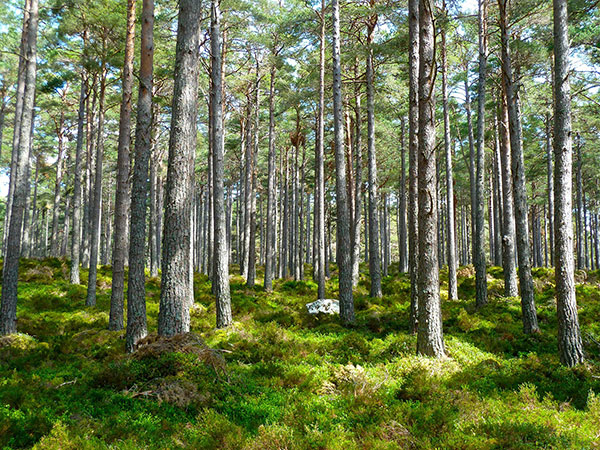
There are thousands of tree species around the world and potentially dozens if not hundreds of variants within species. For example, an American White Oak tree, is very different to an English Oak in terms of wood colour and grain structure. Environmental conditions can also have a huge impact on trees of the same species, even if they grow in a similar location. For example, the density, structure and colour of the timber from a Pine tree that grows in a darker, wetter part of the woods will differ from a Pine tree that grows in a lighter, drier part of the same woods. The age of a tree also affects the wood colour, density and structure of the timber. In short – No 2 trees are the same.
How does this affect wood colour?
All timbers, regardless of age, species, density and growing conditions have their own unique characteristics. For example, pine timbers can typically look pale and neutral when freshly sanded, the timber however, depending on species, inherently has a reddish, pink or yellowy characteristic. This often results in freshly sanded pine floors, turning a golden orange or yellow colour when treated with a ‘clear’ wood oil or varnish. In the same way, the natural timber colouration will influence the final colour of any coloured wood finish. For example, a natural cocoa brown stain will take on a warmer, golden-brown appearance when applied to pine.
Keeping it natural
The good news is that for lighter wood species such as pine, there are a range of products that have been specifically designed to help counteract the darkening or colour enhancing effects usually associated with clear wood finishes. These wood finishes tend to contain a very small amount of white pigment which helps to retain the natural, untreated look of lighter coloured woods. These products however are usually not recommended for dark woods as they can leave a slightly milky looking appearance on the darker, contrasting grain of the timber.
So, what does this all mean?
Simply put, it means that no two pieces of wood are the same. This can make things complicated when it comes to wood finishes and especially coloured wood finishes. The simplest way to explain this is if you paint green on white paper, the result is green paper. Paint green on red paper and you get brown(ish) paper. Apply the same medium oak wood finish to a piece of pine, beech and oak and you’ll get 3 different results.

Red is Red. Right?
To demonstrate the point that the final finish is dependent on the type, age and condition of the wood, we applied the same red wood dye to 3 different pieces of wood and scanned the results.
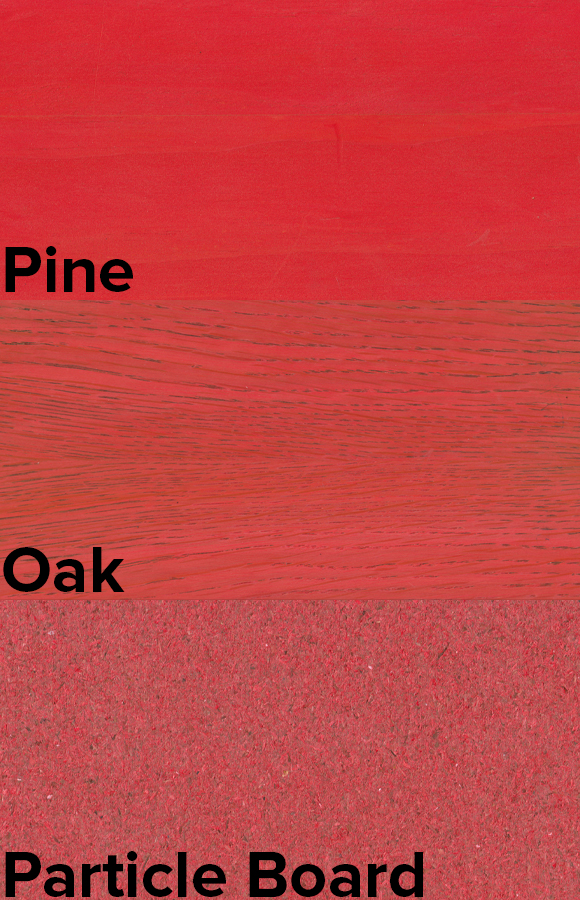
This experiment shows how the same wood finishing product, regardless of colour, will give very different results on pine, oak and particle-board. Colour would differ again if applied to beech, mahogany and larch for example. This shows the importance of always doing a test area before starting any project to assess product suitability, colour and final finish.
Other factors to consider…
When looking at or choosing a wood stain, coloured varnish or wood oil for a project, there are several things to consider.
Firstly, is the timber to be stained smooth or rough sawn? Rough sawn timber has a more open grain structure than sanded wood therefore allowing for deeper penetration of the wood finish. This will result in a considerably deeper, darker finish than if applied to a sanded piece of wood. When sanding wood, the coarseness of the grit will have an effect. Wood sanded with an 80-grit sandpaper will take on more stain than wood sanded with a 240-grit sandpaper. (Typically, furniture and floors are usually sanded to around 120 – 150-grit on their final sanding).
Secondly, monitor or screen calibration. Viewing colours on a computer monitor for anything should never be taken as gospel as every type of screen and monitor is calibrated differently in terms of colour, contrast and brightness. Look at the same product be it a jumper, watch strap or paint swatch on various monitors, laptop screens and mobile phones and they will all reproduce a slightly different colour tone or shade. These images should only be used as a colour guide rather than a true representation of the actual product colour.
And lastly, individual eyesite. Many of us like to think that we have perfect or at least good vision, and believe that what we see is what everyone else sees. Truth is, just like computer monitors and other screens, our own perception of colour tone and strength is individual to us. One person might see black whilst another may see a very deep blue or purple. Who is correct?
Our expert advice
Getting the right wood colour for a project comes down to knowing and understanding what type of wood you have, how it has been prepared (sanded) and by testing various products to get the desired effect, before starting any project. The following tips and advice will help you to avoid many of the most common issues and help you to achieve the perfect finish.
- It’s far easier to make a lighter wood darker than a dark wood lighter. For example, it’s best to avoid trying to make Mahogany look like Oak
- Where possible, For the classiest effect, use clear coats. They enhance the wood grain, patterns and structure of the wood
- Wet the wood with a new or clean dampened sponge (not one contaminated with detergent, bleach or other chemicals). How the wood looks when damp is a good indication of how the wood will look when a clear wood oil or varnish is applied
- Take care when over-coating white finishes such as white wood stains, oils, waxes and paints. Be mindful that clear coats give white finishes an off-white, yellowy or aged look due to light reflecting off the white and refracting through the clear coat. If this look is exactly what you are looking for then a clear-coat is perfect. To retain the whiteness of a finish we recommend a suitable product that is designed to retain the ‘raw’ or ‘untreated’ look of wood
- Ignore the names given to colour swatches and go by the visual appeal of the wood colour. Compare a medium oak colour swatch from 6 different companies and its pretty certain that they will all be different
- Know which wood species you are working with. This will help when seeking advice on which wood finish to use
- In the same way as paint swatches from DIY shops, ours are there to serve as a guide only and do not guarantee the final wood colour
- Always do a test area on the wood that is to be treated be it an off-cut or in an inconspicuous area. For floors, do a test area in a corner, on a floorboard where a rug or piece of furniture will be, or somewhere that can be sanded again if required. For furniture, use the underside of a table, chair or again somewhere that can be sanded again if required. Testing a product on a different piece or type of wood will give a different result
- Always be aware that the type, colour and condition of the wood will always have an influence on the final wood colour and finish
- Take care when sanding wood. Wood that has been sanded evenly will produce a more even colour. Poorly sanded wood is likely to produce a more patchy, uneven finish
- Accept the natural characteristics of the wood. Lighter and darker patches are a feature of natural looking wood
- Work with nature and success is more likely
- Lastly, did we mention the importance of always doing test areas?

Getting the best advice and product recommendations
With over 200 years of combined experience in the wood finishing field, Wood Finishes Direct know a thing or two about wood colour and the best type of finishes to use to achieve a particular look or style. Contact our team of resident experts, who are on hand 7 days a week to answer any questions or queries that you have about your project.


Hi there, can you help with an unusual problem? I am sanding down [by hand] a teak boat interior and took the advice to use wet n dry 360 grit sandpaper ie wet to keep the dust down. All was going well until I noticed when sanding the end grain of the teak there appeared a black stain. And I can only assume it is the coloring coming out of the [possibly poor quality] black sandpaper.
I consequently stopped with sanding wet and went to dry however the dark/black stain is embedded. Is the a method or product such as a varnish stripper that I can use to remove the problem? I would really appreciate your help 🙂
I can send photos if necessary no problem..
Good Afternoon Mark,
I am sorry for the delay in getting back to you, it has been a very busy few months, if you have not yet managed to solve the problem, please feel free to email some photos over to me at wfd.advice@wood-finishes-direct.com and I will be happy to take a look.
Kind regards Samantha.
Many thanks Samantha, You have confirmed my assumptions.
Sadly I now have another issue where one of the main newel posts is delaminating. Out of interest do you have a view on if this is likely to get worse over time? it is on the edge corner of a newel post and has occurred about 1-2 weeks after application of the Polyx oil.
Its not on an area that is going to be touched much but trying to work out how to approach this with my builder.
Hello Peter,
Can you email me directly with some photos of the problem you are having and some over all pictures of the area. I have a suspicion that the Oil has been over applied and not penetrated the wood as it should. If you email me at wfd.advice@wood-finishes-direct.com FAO Samantha and I will be back in the office on Monday to take a look.
Kind regards Samantha.
Perhaps you can help…. I have a situation where as part of a refurbishment we chose an oak staircase. The oak was what I would class as a white oak and we asked the builder to retain that colouring and Matt look. Unfortunately they have not achieved this. They used the satin Matt osmo oil.
I appreciate that a treatment will cause some change to the colour but believe something like the osmo raw product would have given a better result.
So my questions:
Now it has been treated can this be undone and what would be the best way to go about this?
What would be the best product to keep the original look?
The builder slated the osmo raw product stating it left a white residue. Perhaps true and also perhaps applied to heavily.
Any advice appreciated.
Regards
Good Afternoon Peter,
You are right! The Osmo Polyx Oil Raw would of been ideal, it is exactly the same as the Polyx oil, with the exception of a minute amount of white pigment that counter acts the darkening effect of a clear oil. It can be used on pale softwoods and some hardwoods. Milky effects can occur when applied to dark woods or if over applied to any wood. But other wise it is a great product for leaving the wood looking and feeling very natural and untouched.
The only exception I have ever come across is with reclaimed pine boards, if they are very old they can darken considerably still and this is why we always recommend test areas first, wood can be unpredictable.
In terms of what to do now, as the Matt oil has already been applied the wood is unlikely to accept further oil and really applying the Raw over the current finish is unlikely to give the desired effect. To go back to the natural look you would have to sand back to bare wood and re oil with the Raw. I am sorry, its probably not the ideal answer but it is the best way to get the look you want. Perhaps sand a small corner and try a test area first to ensure this is the look you want before embarking on a full strip back and start again.
If there is anything further that I am able to help with contact us page.
All the Best Samantha.