We take great care to give our readers clear, accurate guidance about how to use the wood finishing products we sell. And quite right, too. But there’s no reason why you can’t break the interior decor rules now and again for creative purposes. I do it all the time.
Luckily rule-breaking décor is enormously fashionable right now, with designers breaking free of the tired minimalist mould of recent years to create joyful, eclectic interiors full of recycled, re-purposed materials and masses of thrilling colour. Eclectic, boho chic… whatever you want to call it, it’s hot!
If you’d like to add creative verve, visual interest and a certain je ne sais quoi to your home, here are some of the ways I’ve broken the rules over a lifetime of amateur interior décor.
Creative fun breaking the interior decor rules
Here are some examples of creative rule-breaking that have turned out beautifully…
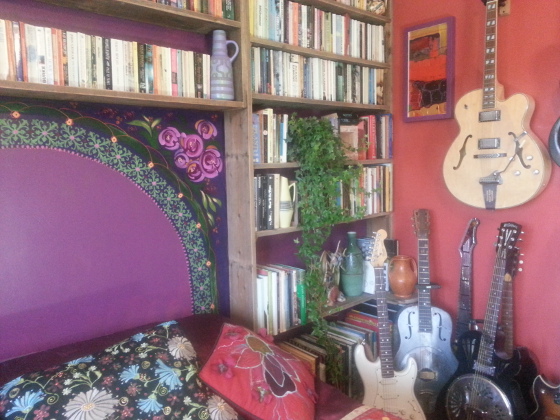
Hand-made pine shelves with no wood finish whatsoever
First a set of pine shelves, fitted to fill an entire wall in our spare bedroom. These shelves are actually old floorboards from a house that was being refurbished in Hanover, Brighton. They’re relatively new, fitted in the 1970s, and would otherwise have been taken to the dump.
The condition of the boards was pretty good, a bit mucky and dusty but otherwise solid. Our friendly local carpenter, who sourced the wood for us as well as designing and building the shelves, did a very simple preparation job. Rubbing down wood with a damp, fluff-free cloth takes off the worst of the dust and grime. Then he let it dry before measuring, cutting and fixing the shelving.
The planks were a lovely silvery grey colour, matt rather than shiny, a bit stained and battered with a beautiful vintage patina. Rather than finishing the wood with a wax, oil or varnish, the carpenter just sanded down the edges of the boards gently once they were in situ to take the sharp edge off and get rid of any small splinters. The sanding has left a slightly paler, smooth edge, providing a subtle highlight and making them look properly finished. And that’s it.
Adding a wood finish would have spoilt the patina. As you can see they look splendid, with an attractive home-made look that retains the wood’s natural wear and speaks volumes about its history.
Modern wooden desk décor with no preparation
We regularly advise our customers about how to prepare wood for a finish. But being an instant results, impatient type of person, I was dying to get going on decorating the bland wooden fitted desk in my home studio. So I ignored all the advice about sanding and preparing and just went for broke. After all, if it went wrong I could always scrub everything off and start again, or even paint over it.
The wood already had a tough, durable finish. I have no idea what it was. Perhaps some sort of super-hard, plastic-like matt varnish. So first I painted the panels with white water-based eggshell paint to give it a key on which emulsion and acrylic paints would stick fast. Phew – it worked perfectly!
After leaving it to dry, I tested it with a fingernail. It stuck fast and I couldn’t damage it if I tried. Next step: add decoration. I printed patterns on the surface of the inner panels using a foam rubber printing block and teal green acrylic paint, letting it dry before adding a racing green border and pink highlights. Then I painted extra detailing on top of the printed pattern.
Once I’d finished fiddling and everything was completely dry, I added a handful of butterfly stickers then painted two coats of matt varnish over the top.
I decorated the desk six years ago and it still looks fabulous, despite the fact that I work in my studio five days a week and it gets a lot of wear and tear. Because the decorative style I used is freehand, casual and sort of shabby chic, minor dinks don’t matter. I paint over the occasional scratch then re-varnish it, which works perfectly.
I’ve also decorated the top of the desk using exactly the same method. The finish sticks faster than a fast-sticking thing from a place where things stick really, really fast. Nice job if I do say so myself!
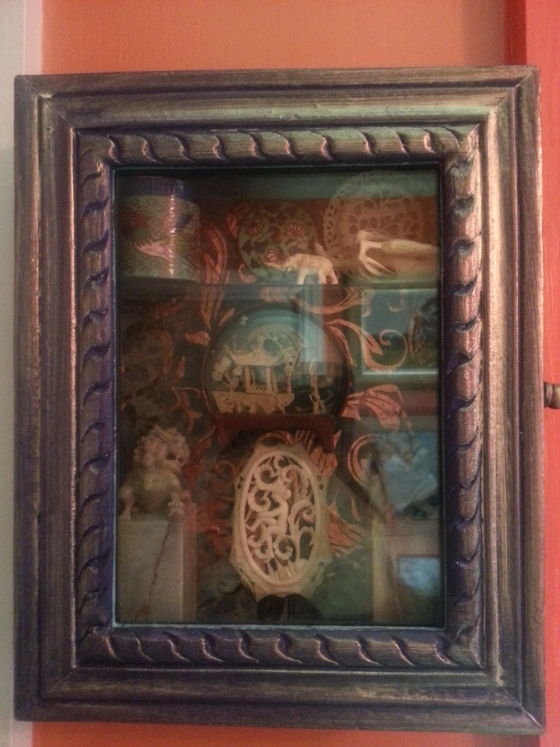
A wooden box made into a miniature curiosity cabinet
I’m the proud owner of far too many interesting little objects. I can’t resist collecting them, but they cause clutter.
How to display them safely and securely? A friend bought me this wooden box with a glass door. It was plain white with an eggshell finish, not really my style, so I simply painted deep purple acrylic paint straight over the top of the original surface then highlighted it with Rowney opalescent acrylic paint in shimmering pink, applied roughly with a kitchen sponge.
I fitted a Perspex shelf inside and filled the box with antique ivory, cloisonné and carved soapstone bits and bobs before hanging it on the wall. Here’s the finished article…
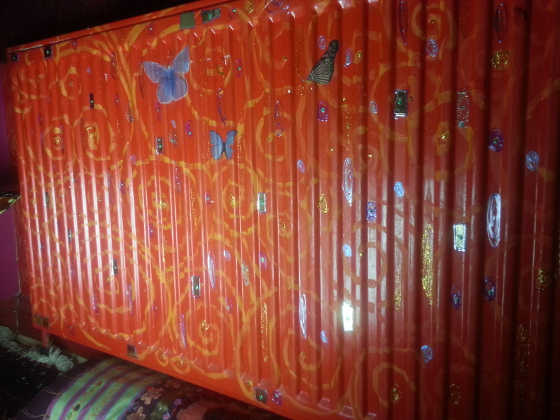
Getting all creative with radiators
I don’t like the way white radiators stand out. They’re so ugly. So I decided to paint them the same colour as the walls. Obviously I leave the moving parts as they are rather than glue them up with paint. Water-based eggshell seems to be perfect for the job, sticking to the surface beautifully. It’s no good painting them when they’re hot, you end up with a horrible sticky mess. Only paint your radiators when they’re cold.
Being unable to let things lie, I painted my studio radiator with tomato red water-based eggshell paint before adding glued-on gold rectangles, inspired by Gustav Klimt’s paintings and cut out of gold card. UHU glue is ideal. Then I added butterfly stickers, painted swirls in orange acrylic and smaller swirls using 3D craft paints.
I finished this project five years ago and, as you can see, the finish is as fresh as it was when I first completed it…
Materials you can use to decorate wood
It’s amazing what diverse materials you can use to decorate with, and they do a great job on a huge variety of surfaces. Here’s some guidance based on many years of experience gilding the decorative lily…
- Water-based eggshell paint sticks fast to more or less any surface including wood, glass, plastic and metal: radiators, plant pots, furniture, photo frames, mirrors… They don’t seem to chip, or at least not in my experience, and you can paint more or less anything on top. Wonderful stuff!
- Tulip craft paints come in small, squeezy bottles. Originally fabric paint, it’s now marketed for use on more or less any surface. I use it to draw over printed and painted designs, both over the top of and underneath varnish. I used them to paint a design on the glass windows of our garden shed nine years ago, on the outside of the glass, and the design is still absolutely perfect despite a series of the hottest summers and coldest / wettest winters on record.
- Glitz It glitter glues are also remarkably durable. They work brilliantly on wood, plastic, fabric, metal and glass. I used them to draw over the design on our shed doors and windows, again nine years ago, and it’s still in perfect condition. I’ve tried other glitter glue brands but they’re nowhere near as tough or long-lasting. Just don’t get it on your clothes – it doesn’t come off, even in a hot wash!
- Leftover house paints, glosses, matts, silks and eggshells can all be used to decorate wooden furniture and a multitude of other surfaces. Most of them mix together just fine as long as you stick with oil to oil-based and water to water-based. You can always mix a small amount first to make sure it works.
Any queries about interior decor?
For more information about interior decor projects, contact our team of resident experts who are always on hand to help with project advice and product recommendations. Alternatively, check out our FAQ page which answers many of our most commonly asked questions. We love to see before, during and after photos of any wood finishing project. If you would like to share your decking project pictures with us, you can either send us some photos or share on our Facebook, Twitter, Pinterest or Instagram pages.


