Not so long ago, interior decoration was all about chilly, bleak minimalism. It suited the times, born of a pre-recession zeitgeist, where everyone and his dog were investing in property, wealth was king and money seemed to flow like water. Then came the credit crunch and the banking crisis… and everything changed.
Minimalist hotel-style décor took a few post-recession years to disappear altogether, but it has finally died a death. Which means Wood Finishes Direct can start getting creative with our interiors again. Shabby chic and French country styling are hot. People all over the nation are collecting beautiful recycled, vintage, retro, up-cycled and found objects, creating their own fabulous paint effects and coming up with some truly awesome DIY decorative ideas.
Home is where the heart is. Décor is fun again! And we’re selling more craft-oriented wood finishing products than ever, testament to the nation’s new, softer, more environmentally responsible, less money-grabbing mood.
Décor these days is less about status, more about personality. So how, exactly, do you shabby chic furniture and other wooden objects and achieve ‘the look’?
What is Shabby Chic?
The Shabby Chic style is described by Wikipedia as…
“A form of interior design where furniture and furnishings are either chosen for their appearance of age and signs of wear and tear or where new items are distressed to achieve the appearance of an antique. At the same time, a soft, opulent, yet cottage-style decor, often with an affected feel is emphasised to differentiate it from genuine period decor.
Shabby chic items are often heavily painted through the years, with many layers showing through obviously time-worn areas. The style is imitated in faux painting using glaze or by painting then rubbing and sanding away the top coat to show the wood or base coats, known as “distressing” the finish of the furniture. Furniture pieces that are not genuine antiques are usually selected for their resemblance to older furniture styles, and may be reproduction furniture with a distressed finish. Elaborate furniture appliques depicting flower swags and garlands, cherubs, and other motifs may be added.”
The type and extent of the Shabby Chic look is very much down to personal preference. For a subtle aged look stick with a single colour and gently distress the natural contact points such as handles and edges to expose areas of bare wood. For a more dramatic effect, use 2, 3 or more layers of colour so that different levels of wear and tear can be achieved.
How to shabby chic furniture
Before we start talking about how to create shabby chic décor, let’s have a quick look at what you can transform and where to get it.
The brown furniture market has been in the doldrums for years, but things are starting to move again, with more of us looking for born-again vintage furniture bargains, many of which are still as cheap as chips.
You can pick up a lovely 1930s Art Deco wardrobe for less than £50, something with much more character than a brand new Ikea alternative. Or you could shabby chic chairs – how about a set of 1970s bistro-style chairs, or a mixed batch of kitchen chairs, each in a different style, easy to find for as little as a tenner each? Then there are shabby chic mirrors, with the frames transformed from gruesome gilded or dark wood nightmares into something cool, contemporary and stylish.
Your best source of all this interior décor treasure? Your local auction house, nearest furniture-focused charity shop or furniture recycling outlet, Freecycle community or Ebay.
What about colour? Obviously you need to decide on the colours before you start. Most shabby chic stuff focuses on so-called ‘heritage’ colours like creamy whites, grey-whites, green-whites, duck egg blues and pale greens, but there are no rules. Anything goes! You can either be bold and use two contrasting colours, or go for a subtle effect using toning colours for a softer look. It’s entirely up to you. It’s worth Googling ‘shabby chic furniture’ then clicking on Google images for inspiration. Alternatively, base your colour scheme on your soft furnishings or the colour of your walls.
What will I need?
Knowing what you need in terms of paint and materials will vary depending on the size of the project and the desired look that you wish to achieve.
Shabby Chic Paint and Materials
You’ll need 2 or more colours of a chalk furniture paint, clay paint or emulsion paint. The choice of paint is more down to the desired look and colour than anything else. All of the following paints can be used to produce Shabby Chic furniture.
Recommended paints for Shabby Chic furniture
A clear or light wax is sometimes applied over the top of ‘chalk paints’ to seal in and protect the delicate finish. Alternatively, coloured waxes can be used to create an even more aged look. Although waxes can be used to enhance and protect furniture, they are not essential as some paint types are more durable than others.
Recommended wood waxes
Ancillary equipment
Other equipment that can make your Shabby Chic furniture project quicker, easier and less messy include: –
- Dustsheets to protect carpets, floors and other surrounding items. For this we recommend Marshall Cotton Twill Dust Sheets.
- For cleaning old finishes and surface preparation, we recommend Barrettine Sugar soap. It effectively removes dirt, nicotine stains, grime and grease prior to painting
- Good quality synthetic bristle paint brushes are essential, one for each colour or coat to reduce the chances of cross colour contamination
- Good quality sandpaper sheets for sanding back the top coats. For small jobs we recommend Woodleys Sandpaper Sheets. If making Shabby Chic furniture is more than just a DIY hobby, consider Woodleys Aluminium Oxide Sandpaper Rolls. Measuring 115mm x 50mtr, there’s enough sandpaper to keep a small Shabby Chic furniture production line going for some time
- A soft buffing brush can be used to buff soft wax on to the furniture once painted and distressed. We recommend using a pure bristle brush with a curved shape and super soft bristles for buffing
- For those wishing to varnish the final finish, consider a clear interior varnish. Always check compatibility with the paints used first by doing a test area. A popular choice for this is Polyvine Decorators Varnish
- Use a flexible filler knife for repairs. The same tool can also be used to distress the furniture once painted. We recommend the inexpensive Mako Filler Knife for this
- Wear an apron or overalls to protect clothing
- Wear safety glasses or goggles to protect eyes from dust and splashes
- A dust mask is essential when sanding furniture and especially if sanding very old paints and varnishes that may contain lead
- Protective gloves will protect hands from dust, dirt and paint
- A bucket or paint scuttle for cleaning brushes and other equipment
Before you start
As with any project, planning is key to a successful outcome. It may sound obvious but decide in advance how you want the finished piece to look. Make sure that the finished fixture or piece of furniture fits in with the overall scheme you want to create, redefining your surroundings and taking you on a stylish journey. Spending money on furniture and materials without a plan in mind might result in wasted time, effort and materials. The internet is awash with pictures of inspirational styles and ideas to get those creative juices flowing.
For example, decide whether you want to use just varnish, one coat of paint, two or more. Know whether you want to accentuate the natural colour of the wood with a light stain or through a single coat of white, or whether you want to use a strong colour as a top coat and distress it to show the white undercoat or all the way back to bare wood.
DIY for cheap shabby chic – 8 simple steps to interior design heaven
You’ve found a piece of furniture you want to shabby chic. Although the process may vary depending on the type of paint used, the desired finish and if a wax or varnish is used, Here’s how:
- Prepare the wood – Remove the existing wood finish to create a key so your new paintwork will stick properly to the surface. If the wood has been polished with wax, then a wire wool pad plus turps or white spirit should do the trick. If it’s varnished, use sandpaper or a good quality paint and varnish remover.
- Apply a coat of water-based acrylic primer – This simply gives your furniture a smoother finish, making it easier to work on. Because it’s a shabby chic project, you don’t need to be neat. Even if you’re rubbish at painting, you’ll be fine. Have fun!
- Apply two layers of paint – Next you need a couple of thin layers of coloured water-based acrylic paint. Let the first layer dry completely before adding the next one. You can also gently sand the first layer with very fine sandpaper, say 180 grit, to provide a better finish.
- If you just want plain, painted wood, just seal the paint with acrylic varnish then skip to Step 8 below. Then you’re done. But there’s more. If you want to go the whole hog and get involved with actually distressing furniture, we’ll look at that next.
- Distressing your painted wooden furniture – Distressing furniture also involves the first Steps 1 & 2 above. But instead of applying two coats of the same colour, you create a two-colour distressed finish where the second layer is rubbed away to reveal the first for a ‘natural’ wear and tear look. Again, acrylic water-based paint is perfect for this.
- Add your first colour and let it dry completely. Now for the clever bit. You simply dab streaks of clear furniture wax where you want the wood to look distressed. You can use a paintbrush to apply the wax, or cloth, or a small sponge – a kitchen sponge will do – or even your fingers. The wax repels the second layer of paint, letting the base colour show through. You need to paint the second layer of paint over the whole thing, wax included. Let it dry, then wipe the furniture with a soft cotton cloth to take the paint off the waxed areas, leaving a brilliant effect that looks as though it’s just come out of a posh interior décor shop.
- Not distressed enough? You can attack the pre-painted furniture with wire wool or sandpaper, scrape it with a large nail or even bash it with a hammer to take off the paint as deep as wood level. If you go wrong, just paint over it, or wax and paint it again. The most difficult part of the job is to make the distressed effect random – avoiding creating a pattern of any kind. As natural pattern-seekers, humans find it difficult to ‘do’ random. But luckily it’s more or less impossible to get the shabby chic look wrong.
- And finally… the finish – All you need is a good quality clear beeswax polish or furniture polish. This delivers a lovely lustre as well as protecting the surface if not using a varnish.
Creative ideas
You might want to create an entire shabby chic bedroom, with matching or contrasting paint jobs on your bed, wardrobe, chairs, dressing tables or even modern fitted wardrobes. You can even create the effect on wooden doors.
You may prefer to take it easy and mix ‘n’ match plain wooden furniture with distressed pieces for that popular eclectic look. You can use bold, bright Mediterranean and Mexican colours to make a big, bright impact. Or stick to cool, subtle shades, for example a collection of different blues, creams, lilacs or greens.
For a final splash of colour, you can add applique images. Here’s an idea: buy a second hand book about butterflies, ferns, birds or flowers from a charity shop. Cut out a handful of beautiful pictures, for example a host of gorgeous butterflies or a flock of birds. Glue them onto your furniture with PVA glue after you’ve completed the paint effects but before you wax it. If they stand out too much, paint a watered-down layer of your top coat colour to mute the colours and blend them in with the background. Then wax over the top once everything is 100% dry.
Need help with your Shabby Chic furniture project?
For more information about interior furniture paints and their uses, contact our team of resident experts who are always on hand to help with project advice and product recommendations. Alternatively, see our wood paint FAQ page. We would also love to see before, during and after photos of any Shabby Chic furniture project. If you would like to share your project pictures with us, either send us some photos or share on our Facebook, Twitter, Pinterest or Instagram pages.


I have a question; you suggest chalk paint, but also say that water based acrylic is fine…..are they the same thing?? Because I have tons of rustoleum and tons of acrylic paints…I read somewhere that you can use plaster of Paris; 1part to 3 parts water (I think) then adding the colour….I’m illegally painting my apartment ;-)! Pretty sure I wasn’t going to get my security deposit back anyway!!
Good Morning,
They will not be the same thing although they may have similar aspects. Essentially the ingredients in any one paint brand, or type to another will vary, even two products called Chalk Paint can have a varying ingredient or the same ingredients with varying amounts. More chalk and less water, more pigment less binders, makes for a thicker paint, reduced coverage, but higher build. Stronger colour but less adhesion and so on.
This is why test areas are so important and it is vital to read the product details and guidelines first. There can be a lot of information and it can be a little overwhelming, so if you do need help or advice we always have a team on hand to answer any questions. Just get in touch via our contact us page.
I regards to the Plaster of Paris, I could not say, I would not expect this to give a long lasting result or adhere particularly well to give a paint like finish.
I hope that helps some and do get int ouch if you find you need further advice.
All the Best Samantha.
Hello I want to paint a family piece I’ve inherited. I love the urban chic look. I want to get the look where some of the original wood shows through. Have I understood right that I’d sand the existing varnish off then I’d apply wax to the bits I want to show through then my chalk paint first colour, then I could sand that and wax the bits I want to show through and so on? thanks for any clarification
Hello Lynda,
There are various ways to get the distressed look on furniture and applying wax to certain areas first is one of them, it something that requires a little skill and experience in getting the wax in the right places. The wax will prevent the paint from adhering to the surface.
There are alternate way to do this that include using two different paint colours, or for one colour with a natural wood exposed simply paint the furniture and once dry sand the areas you would like exposed. When using Clay Paint or the Ronseal Chalky Paint it can be fairly easy to apply and then using different grits of sandpaper you can give the item that distressed feel. For authenticity you can sand areas that are likely to be susceptible to wear and tear like handles, edges or corners.
You can have great fun with projects like this and play around with various techniques, many of which can be found on You Tube tutorials.
I hope that helps and if you have any questions please feel free to email me at wood@finishes.direct
Kind Regards Samantha.
Would you consider giving a tutorial in person ?
Hello Loveena,
It would be great if this was something that we could help with, but at this time we are not running any workshops. Sorry. I am sure that there are many out there and you will be able to find one to suit your needs however. If there is anything further that I can help with please do not hesitate to get in touch.
Kind regards Samantha.
Hi there,
I was curious how you would change these instructions if the wood shelves are the colour you would like to show through the paint after it is distressed? So there is no need for a base colour but would you still do a primer + 2 layers of paint before distressing to have the original wood colour peaking through?
Thanks!
Hello Corina,
If you are using the wax technique then you can apply the wax first to the areas that you want the wood showing. And then paint as per point 3. Test area are always recommended to ensure you are getting the finish that you want and that this is the technique for you.
We always enjoy seeing the results of our customers project and if you like you can send in photos via our contact page. Feel free to let me know if you have any further questions.
Kind Regards Samantha.
would like to know how to put flowers onto furniture and how to seal them once done as I am doing this as project for pensioners thanks
Hello Jenny,
Do you mean stencilling ? With Paint ? It will depend a little on if the furniture currently has any finish on it or you are applying to bare wood ? Or if you are just looking to find something that will go ontop of anything with little or no preparation. Feel free to email me with some more information to wood@finishes.direct and I should be able to help you further.
All the Best Samantha
I have a small 1920’s deco coffee table, badly water marked and with dark woodstain. What is the best way to prevent the stain leeching through the paint please. The foot is damaged so needs repairng and painting and I would like to finish the top and shelf in white wax to keep the rustic wood grain.
Hello Ruth,
Are you able to sand the table to remove the staining ? Also sometimes, simply giving a light scrub with some warm water can help reduce staining, but you should do a small test area first. Can you tell me what the wood is and also if there is any treatment on there currently ? Maybe if you are able to send a photo to me at wood@finishes.direct I will be able to help further.
Kind regards Sam.
Hi
I would like to distress a lovely old bureau.
It is a cream colour so I need to paint a. See colour first to show through for the distressing ? Can I just paint the bits I will sand to distress and not the whole thing in the base colour ?
Or can I skip the base colour ? I’m thinking the original dark wood will show through when I sand it to distress ?
It is also covered in transfers – should I sand these off ?
Thank you !
Hello Julia,
It is possible to just paint the areas with the base colour that you are going to distress. However be careful if the paint you are using is on the thicker side. If it is you may find that lines will be visible and you will need to lightly sand those smooth. Or alternatively as you say you can simply use the base colour of the wood.
I would also recommend removal of the transfers, again painting can highlight any edges. The key to getting the right look will of course be to carry out test areas. Feel free to let me know if you have any further questions.
Kind Regards Sam.
I have a three foot two shelve one drawer book case.
It is shiny wood finish. About 30 years old. Repro model
How do I get rid of the shine before I start to paint in mat cream paint.
I do not want a distressed look. Just plain and simple.
Thanks
Hello Jane,
Do you know what the piece is made out of or if it is solid or veneered ? It is likely to be a varnish on the bookcase but due to the age its would be best to clarify a bit more information before I advice. Of you are able to send a photo this would also help and you can email wood@finishes.direct with details of the question and all relevant information needed.
kind Regards Sam.
Hi Sam
I have a to unit and buffet in a dark mahogany finish. The colour is dated and I would like to transform to shabby chick. It seems to have a vanish finish. What are the steps to transform this to shabby white.with specks of grey distressed look.
Thanks Kathy
Hello Kathy,
To achieve that two tone shabby chic effect you need to apply two contrasting colours, the only product that we have that is suited to this is the Earthborn Eco Chic, which has a wide range of colours available. Have a read up on the product and if you have any further questions, please do let me know.
Kind regards Sam.
I was delighted to come across your site with such clear instructions on how to distress furniture particularly as at the weekend I wandered into a little Interiors shop. I was admiring some of the painted furniture and when I asked the shop owner how to create the distressed effect, she wouldn’t tell me! As though it was a trade secret. So, thank you for lifting the lid!
Hi, Great post! Found it very helpful. I am currently painting a desk for my daughter and I keep getting little air bubbles come up and sometimes the paint is noticeably thicker in other places. Do you know any tips other than sanding? I would really appreciate it, many thanks. Elyse
Hello Elyse,
Its difficult to say with out seeing desk and the paint so I would recommend sending in some photos to our email address which is wood@finishes.direct and I will be happy to take a look. If you can include what preparation you carried out, if there was any previous product on the surface of the desk, what you have used for application, ie brush or roller and what is the name of the product you have used. Hope fully I will be able to offer some advice – Sam.
Dear Sam,
I have a set of four matching Victorian bedroom chairs with cane seats. I intend to under-upholster the seats with suede covered seat pads for strength.. So they can actually be sat on and not harm the cane. That’s no problem, I need to shabby chic the set to go with our Art Deco decor and colours…. But reading your blog I see you use an acrylic paint and or a chalk paint. This confuses me I thought it was all done with ordinary wall paint. I had intended to use the emulsion colours I’ve painted my walls for perfect match. Please could you clarify? Thank you in advance
Nerissa
Hello Nerissa,
Thank you for your inquiry, creating the Shabby Chic or distressed look is still very popular and there are a number of ways to achieve the finish that you want. I am not a specialist in Emulsion paint but I would say that if you are keen to keep the colours matching then I would recommend a test area with the paint and seal with an acrylic varnish.
As an alternative I would recommend having a look at Earthborn Claypaint, which is a product we have brought in since the writing of this blog. It is ideal for a project like yours and has 72 clay paint colours in its range. Either way test areas are important not only to check that you like the finish but also to ensure adhesion of products. Please let me know if you have any further questions – Sam.
Hi iv bought some shelves and kitchen units I want to go in my kitchen I’m painting all shelves in some chalk paint then wax but I must say out of all the sites I looked at for a real beginner when it comes to do a shabby chic look I felt them long winded but came across yours and it was the best site iv found to show us easy steps and I can’t do a lot as I have crippled hands so thank u so much for your help it was really good and useful
Hello Karen,
I am pleased that our Blog has helped and we would love to see the finished project. Let me know if there is any thing I can help advice with – Sam
Hi
I’m looking to turn a chest of drawers into something that looks distressed I’m having trouble choosing the correct brand of paint the drawers have been painted previously with gloss. I’m looking for a grey background under white and then distress to show the grey coming through I’velooked at some egg shell paint but there are so many farrow and ball seem quite popular please can you tell me the correct brand so l get it right first time. Many thanks.
Hello Hayley,
Thank you for your inquiry, you could have a look at the Earthborn Claypaint which is ideal for this project. There are 72 clay paint colours in the Earthborn range and you can apply your grey first and then a coat of the white and then sand back to create your distressed look.
The Clay paint allows the wood to breath and gives a Matt flat finish. If you would like some sheen to it then a Wax to finish can be buffed to the required shine, but be aware that sometimes adding a wax to a white finish can create a yellow tinge.
I hope this helps and please let me know if you have any further questions. Also if you do go with the Clay paint we love to see our customers projects and if you would like to send photos the address for this is wood@finishes.direct
Kind Regards Sam.
I’m just about to start shabby chic my wooden stair banisters,how should I do this if wanting wood to show through do I still use white primer?
Hello Christine,
This will depend on what colour and product your intending to use. If you would like to email me with some more details about the look you would like to achieve and products you hope to use, I can advise you further. You can email on wood@finishes.direct – Sam
hi I am painting a long consort table that’s in my living room which does get used (cups of tea and pictures and 2 big lamps, I was wondering if I used chalk paint , can I put a clear varnish (mat) over the top because when I have used chalk paint b 4 and used a wax to cover it when u put anything on it it can still leave a mark which I don’t want ,
please help
Hi Debbie,
You can use varnish over a chalk paint but I have had very limited experience with this. If you can spray the varnish on to the surface of the Chalk paint that is undoubtedly going to give the best outcome. Brushing on can agitate the paint and cause it to come away. Manns Extra Tough Interior Varnish would be an ideal product for you as it is durable and easy to use. Beware of applying clear products to white finishes, as they can sometimes have a slight yellow tinge show through. Always try a test area first. Let me know if there is anything else you would like to know – Sam
Everything is perfect apart from the handle rings, keep coming back after sanding down. How do I eliminate this?
Hi Paul,
You will need to be a little more specific about your project and exactly what the problem is as well as what products you are using. If you can get me all that information I will happily advice you. Thank you – Sam.
Hi, great website!
I have a repro mahogany dining table which we bought new about 20 years ago. It is solid , not veneered , and the top is French polished. There are now lots of white patches on the French polish ( from water spills or heat? ) and a few small chips in the surface. I want to paint the legs of the table and refinish the top surface with something more practical – I was thinking oil? What would be the best way to remove the French polished surface, and what products would be best to use for the new finish?
Hello Paula,
I have spoken to one of experts in wood finishes about this one. He says to remove the French Polish he would soak a cloth in Methylated Spirit and leave it on the surface for 5 – 15 mins, as it is a veneer the less time the better,and you should do a small test area first to ensure no damage is caused you should see the polish start to pickle (bubble up) and you can then scrap it away with a cabinet makers scrapper or a pull scraper very very carefully. A test area is important, not knowing exactly what the product is on the surface or how thick the veneer is means that it is important to proceed with great care.
For a Oil based product to finish the wood, once you have got back to bare wood, you could have a look at the Osmo Polyx Oil which is great for well used surfaces and is easy to maintain and repair. It will darken the wood slightly, which most oils will do. If you wish to avoid this then have a look at Osmo Polyx Oil Raw which is designed to leave the wood looking as natural as possible. We would love to see some photos if you get chance, you can send them to wood@finishes.direct
I work with teenagers with special needs and we have used your directions to “shabby-fy” some old coat hooks, a mirror and a high-chair , we have sold these items to make money for the school.
Hi Stephie,
That’s great, we would love to see some photos and share them on Social media pages for you!!
It took me a bit of courage to paint some sentimental items. I have a wooden sewing box, on legs, which was first upcycled in 1948, when a great uncle made it from an old wardrobe – it’s a lovely little piece, but was stained brown, and neglected looking.
I have shabby chic- ed it in a pale green with a blue top coat distressed to show the green through.
I love it and look forward to doing more. A tip for those with sentimental furniture like I have – type up a little history of the piece and tape it onto the back of the piece of furniture, the provence is such a nice thing to have !! 🙂
Hello MaryJoan,
Thank you for sharing your story with us. We would love to see some photos of your sewing box. You can send them to wood@finishes.direct. And what a great idea to write a history for the piece!!
Wow, this piece is inspiring! I found it while searching for ideas — I am painting an old dresser for my boys room.
The table is waiting and now after reading this tutorial I feel ready to tackle it. I hadn’t realised the wax removed the paint I thought it protected it! Doh!! Wish me luck
Hello Nicola,
It is a clever way to create the effect that you want, applying the wax to prevent the paints from adhering to the surface and then wiping away. If you have time to send us some photos of your project, we would love to see!
Great tutorial! I am a decorative artist and having done almost all of the decorative art and image transfer techniques, shabby chic furniture was my next step. I am really looking forward to trying this out. Thank you for the great and easy to follow instruction.
Hello Heather,
Glad you enjoyed the blog, we would love to see some photos of your Shabby Chic projects when you have done them !!
Hi great tutorial, I have adapted slightly to suit my needs. Am now on my third project a small book shelf which I am following your method using two colours. I have used rustoleum duck egg, which I added some pigment to, to make it more baby blue as my under colour and rustoleum chalk white as the outer layer. Instead of painting the entire piece with the blue purely to save paint I only applied it to the places I wanted to distress then applied the wax. I am now just waiting for the white to dry before the rub down to see how it turns out. But I am confident it will look perfect because of the previous items I’ve done, following the method basically, but instead of using an under colour to come through, I have just used the colour of the wood. I completely sanded them down first, removing all of the old varnish and then applied bees wax to the areas I wanted to distress. The tops of my first two projects (coffee table and magazine table) I left unpainted and applied the rustoleum chalk white. Once dried and rubbed down with soft cloth I applied the bees wax to the tops. Both look amazing and so professional. So thank you for your help.
Hello Tony,
That’s great to hear and we would love to see some photos of your completed project to share on our Social websites, if you have the time. You could send them to wood@finishes.direct
Many thanks – Sam
Hi there , great tutorial, im a trained cabinet maker but all my furniture is in the utterly dated antique pine wax finish, im a dab hand with a chisel and saw ha but when it came to a paint brush im out of my depth ha, this tutorial alone has changed that ,my bed and bedsides look amazing now , extremely helpful especially the idea of putting wax on the first coat of paint , very clever, il be looking out for more of your ideas thanks again
Hello Shaun,
Thank you, its always good to hear how helpful our blogs and tips are, and we love to see photos of peoples projects. So if you have time we would love to see some photos. You can send them to wood@finishes.direct – Sam
Excellent tutorial. I own a small dark wood cabinet which the silver service is kept in. I’ve hated it for years! You have inspired me to shabby chic this in duck egg blue to suit our decor. Many thanks for the inspiration …… 🙂
Hello Isabelle,
Thank you for letting us know and feel free to send us some before and after photos – Sam
pls can you tell me how to seal photos on a shabby chic table ! ty
Hello,
There are a number of ways to transfer photos onto wood. You would require a specialist product usually called Photo Transfer Medium, some wood to apply to, and something to seal with. ( Mod Podge comes highly recommended ) Once you have your image, on copy paper, apply the medium and spread of the whole image and then place face down on the surface of the wood, taking care to remove any air bubble. You probably need to leave it for around 24 hours and then gently scrub of the paper and seal to protect. Do look out for a future blog on exactly how to do this.
Have read the process of making my furniture into shabby chic and I have found your instructions very useful and will be attempting this today, looking forward to seeing the result.
Hello Ann,
It would be great to see some before and after photos if you have the time to send them in to wood@finishes.direct
Many thanks.
Looked at this shabby chic & the paint stripping video – good info. Be interested in feedback on , or experience stripping paint from Lloyd Loom chairs with the Peelaway product? I seem to see seeing a lot of tips to not use Nitromors. Thanks 🙂
Hi Pauline,
Unfortunately, we don’t have any direct experience of stripping paint from Lloyd Loom chairs i’m afraid. We recommend that you contact the manufacturer directly as its possible that agressive paint removers may soften or weaken the weave of the chair.
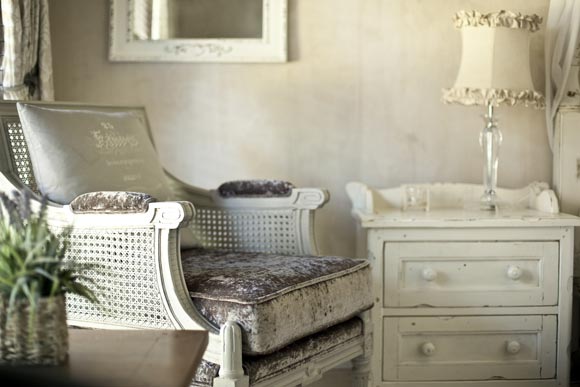
Amazing tutorial! One of the best on transforming furniture into the shabby chic look. I am also in love with that room in the first pic. I must have it!
Hi Jess,
Pleased to hear that you enjoyed our blog post on how to Shabby Chic Furniture for a stunning contemporary look. I hope you found the information useful. Feel free to contact us at any time if you have any questions about the products we offer for these sorts of projects.