As many of you will know, here at Wood Finishes Direct we love upcycling projects. And recently we received an email for one of our customers called Andrew, who is an Architect and a lover of all things made of wood. Andrew very kindly sent us some photos of a project that he was working on in his very own garden and when we saw the photos, we knew it was only right that we shared his shed building project with others who may be wondering how to build a shed.
Andrew has given a great account of how he went about completing this great project and is thrilled that we’re sharing his experience on our blog. Have a read and let us know what you think in the comments below. So, from here on in, it’s over to Andrew…
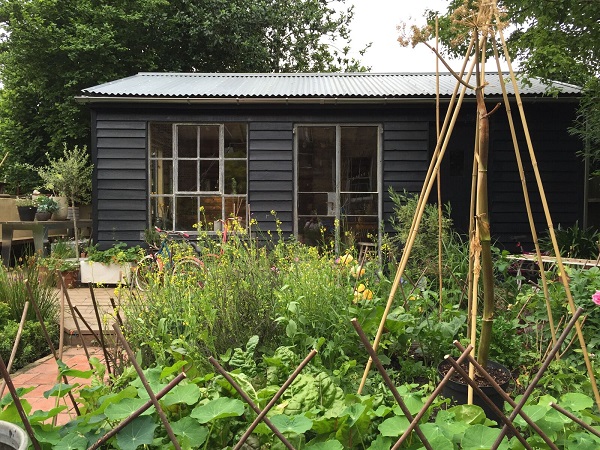
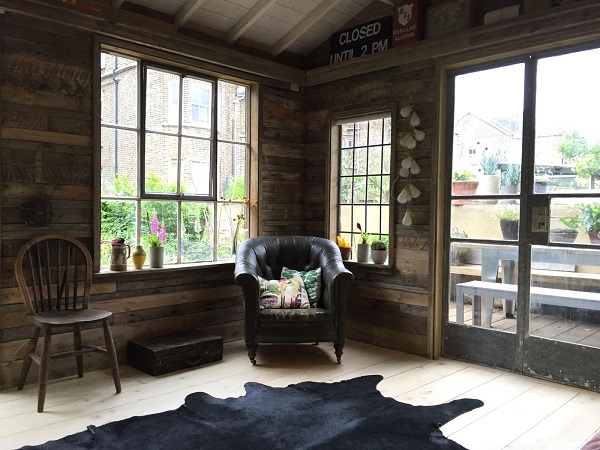
The building is 6x4m on plan with the summer house part being 4x4m and a separate section of 2x4m being used as a shed. We call the whole thing a shed! It’s generally finished but there are some more things to do to finish it off. It’s taken me 2 years to build (largely on my own at weekends). I’m an Architect during the day.
The timber on the interior walls is from used pallets – around 70 of them to be exact. The garden shed was built from scratch, insulated and the inside clad in OSB board before being over-clad in the reclaimed boards from the wooden pallets.
Reclaiming the pallet boards is time consuming pulling out the nails is almost impossible so the pallets need to be sawn up chopping off the nailed ends. The boards then need to be stacked to dry. Squaring the ends and then sorting into bundles of the same width then follow. The benefit of fixing them to a board and not directly to the framework is two fold: 1. That you don’t need to worry about starting and ending on a stud (which would give a less than random effect). 2. The gaps which you inevitably get (the boards aren’t millimetre perfect) are blocked and you don’t end up seeing through to the insulation in the wall. Also the boards do help to brace the structure. (That’s three fold.)
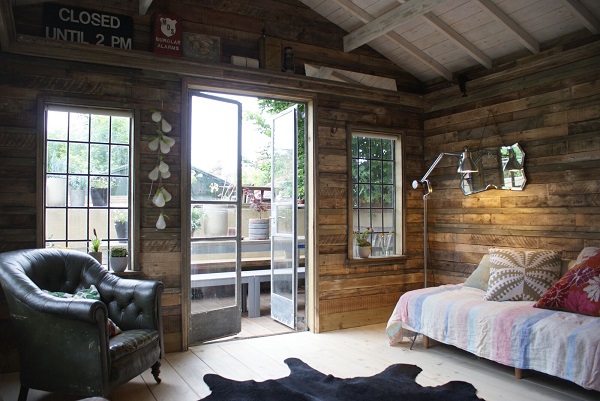
Every so often I put in a line of batten and check with a laser that the bands of timber are level. It proved to be helpful that I hand nailed the boards in place using simple 40mm panel pins as they sometimes needed removing and adjusting or replacing. In the end I re-nailed the boards with annular nails which hold the boards much better.
The battens have been dyed with Manns wood stain (driftwood colour). This helped to blend the battens in with the pallet boards. Finally the boards were lightly sanded to remove the worst rough parts but this also removed some of the dirt off some of the dirtiest boards. It also helped to accentuate some of the saw marks on the boards which can be quite interesting. I found about 10 pallets but ended up buying a mixed load for about £1 each (which really covered the cost of having them delivered).
My shed also has a high level shelf running around three sides, just under the eaves. This was made from old scaffold boards. It blends in perfectly with the pallet wood, so you hardly know it’s there.
The ceiling was made with Softwood T&G. This shrank quite a lot and the joints opened up but I quite like that. It was primed (along with the roofing timbers) with a Zinzer primer and then lightly sanded. I like the contrast between the clean roof and floor with the walls.
The windows and doors were purchased on eBay over a period of time, they are 1930’s Crittall steel windows. They were painted and quite crummy looking but the paint can be scraped off quite easily which takes you back to the galvanising which is perfect. There is little to no rust. I’ve had to replace a couple of panes of glass but that was mainly because they got broken in storage.
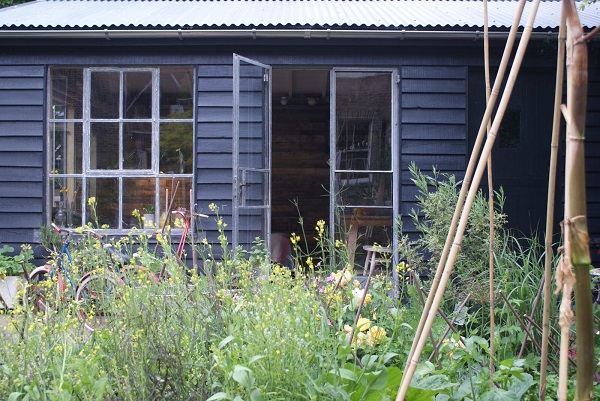
Externally the shed is clad in Siberian Spruce bandsawn feather edged boards. And was painted with RUST-OLEUM PEGAPRIM ISOFIX – SHELLAC STAIN BLOCKER primer and then top coated with Tikkurila Valtti Ultra which was colour matched to a Farrow and Ball colour. The paint is very expensive but should last a long time. The primer acted as undercoat and was tinted as dark as possible which saved a lot of time.
We did look at using reclaimed corrugated iron for the roof but it would have been challenging to find the right amounts and also getting the right accessories. In the end we picked a heavier gauge new product and got the lengths cut to size. One of our inspirations for the shed was Derek Jarman’s Primrose Cottage in Dungeness. This has a tin roof which is painted black to match the walls. This was our original intention but you can’t paint freshly galvanised steel as it has a coating that prevents the paint from sticking. So we left it to wear off. We actually liked the galvanised roof in the end so we are leaving it. I finished off the roof with Galvanised guttering by Lindab to the front and standard black plastic to the back (which is never seen). There is a large water butt on the rear for harvesting rainwater.
We wanted to reuse and recycle much more but the availability of sufficient quantities of appropriate material can be difficult to find and often the transport, time and hassle can out-weigh buying new. Some of the OSB on the inside was second hand. But some proved to be so wet it was impractical to use (difficult to dry and twice as heavy as dry boards). As a result I purchased some new sheets to complete the job.
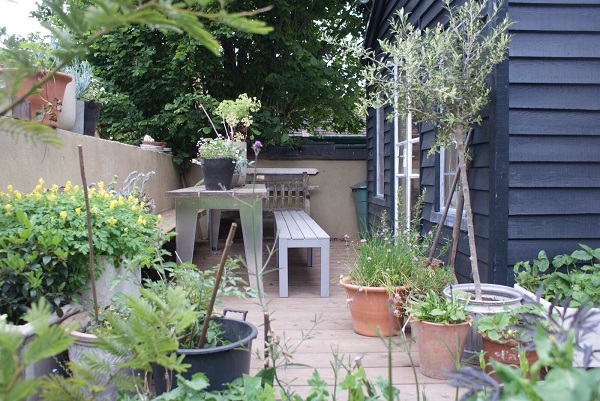
Externally we built a deck around the shed. I don’t like grooved decking board which is pretty ubiquitous, and originally wanted to use used scaffold boards. But in the end found heavy decking boards that were smooth and wide. Just need to let the sun and elements weather them in. We are just finishing off an external seating area with a cantilevered bench and a table both made from used scaffold boards. The frame to the bench is a (new) galvanised workshop bench was that I found on eBay and made to my own dimensions. At £160 it’s pretty inexpensive and will survive being left outside.
Back on the inside the floor of the shed was made from new untreated scaffold boards. These are rejected scaffold boards as they have structural defects. They were untreated and suitable for all sorts of applications. These were screwed to the sub floor, sanded and oiled with one coat of Fiddes Hard Wax Oil Tints in White followed by one coat of the same product in clear. The boards are all single lengths which gives a great look. Not dissimilar to a Dinesen for floors but for a fraction of the cost.
A massive thank you to Andrew for sharing his experience and allowing us to share it on our blog.
If you’ve been inspired by Andrew’s project, or even ‘Shed of the Year’ which is currently on Channel 4, and are now thinking about how to build a shed of your own, with its own unique character and charm, there has never been a better time to do so.
For many businesses, the summer season is their busiest meaning lots of deliveries and lots of surplus pallets. And, for the remainder of this week, we also have 15% off all our Shed and Fence products (Expired), meaning that even if you’re not likely to finish your shed build this week, this month or even the next couple of months, when you do, you’ll have everything to hand to finish you’re shed build project. All you need to do is enter the discount code SHEDLOADS on the checkout screen of our site and you could potentially save, well ‘shed loads’ on all the things you need.
Need Help?
If you need help on deciding which products you need for your shed building or restoration project, our team of helpful advisers are always on hand to answer any questions you may have. Feel free to contact us and we’ll get back to you shortly.


