Here at Wood Finishes Direct, one of the most common questions we get asked is ‘How much paint, varnish, oil or stain do I need?’ Although there are logical calculations that can be used, knowing how to work out area for wood finishing products isn’t always as straight forward as simply measuring the physical dimensions of the surface area to be treated.
In this blog, we aim to take out some of the uncertainty relating to product coverage and explain why the normal methods used to calculate an area, for say a carpet or floor tiles, won’t always work for wood finishing products. So, how long is a piece of string we hear you ask!
When contacting us for product advice, you can be certain that our team of experts will ask you several questions such as, what type of wood are you working with? Is it bare wood or previously finished, oiled, waxed, varnished or painted? For decking as an example, we’ll ask if its smooth or grooved? This is because there are a number of factors that are directly related to the wood that can have an affect on how much product you need.
Did You Know?
Did you know that grooved decking can have a considerably larger surface area than smooth? How can this be we hear you ask. Imagine a piece of paper that has been folded along its length to form a concertina or corrugated effect. In its folded form it may measure one square meter, straighten the paper out so its flat and the actual surface measurement could be 1 x 1.5 meters or more depending on the depth and number of folds. If grooved decking could be flattened out, the same principle would apply.

When we ask questions about the wood you’re working with, although it’s handy to know the type i.e. Oak, Pine, Mahogany, Beech, Cedar, Larch etc, we know that not everyone is a wood expert, for that reason it’s not imperative to know if the timber is English Oak, French Oak, Canadian Oak or other specific variation. As a general rule, although there can be exceptions with some tree species, Oak is Oak and Pine is Pine. In most cases, all we need to know is if the timber to be treated is a hardwood or softwood. For more information on the key differences, see our blog post about softwoods and hardwoods.
Working Out Area With Simple Maths
So starting with the basics, it’s time to work out how many square meters or feet there are in your project. Let’s start with an easy one, a rectangular table top that is 2 meters long and 1 meter wide. To work out the square meterage, simply times one length by the other, 1 x 2 = 2 meters squared, easy huh!! Or if you prefer to work in feet then there are many metric conversion calculator online that can work out the conversion for you. As a rough guide 1 meter is equivalent to around 3 feet 3 inches.
Now we’re sure for many, this is teaching you to suck eggs as it’s fairly basic math, however it is the starting point for many more complicated projects. Getting back to the table top for now, the next thing to work out is how much wood varnish, stain or oil you’ll require to treat 2 meters squared, this is where our handy product coverage calculator comes in handy.
For every product on our website there is an area calculator to the right of the screen, where you can input your 2 dimensional measurements to get a guide as to how much of the product you’ll need. Phew I hear you say, as this can make life so much easier. (trust me, we use it all the time too ) Many of our calculators will tell you how much you need for 1, 2 and sometimes even 3 coats of a specific product. And for decking paint and oil it will even calculate how much you need if your decking is smooth or grooved, clever stuff!!

How Much Product Do I need? The Unique Nature Of Wood
This is where the unique nature of wood comes into play. So, as an example, 2 coats of wood oil requires twice the amount as one right? This is where logic starts to distort slightly. In simple terms, wood is a little like a sponge so in terms of micro-porous products like oils and waxes and even with paints and varnishes to a lesser degree, more of the first coat is absorbed into the timber surface so requires slightly more product than the second coat. This has been cleverly programmed into our product coverage calculators but even these can’t take into account other influencing factors such as, how old the tree was when felled, how long ago the tree was cut down, how the timber from the tree has been stored and even the natural characteristics of that specific tree. Truth is that you could have two pieces of timber, same species, same age, same woodland or forest and potentially even from the same tree that will absorb different amounts of the same wood finishing product.
Calculating the Area of 3 Dimensional Objects.
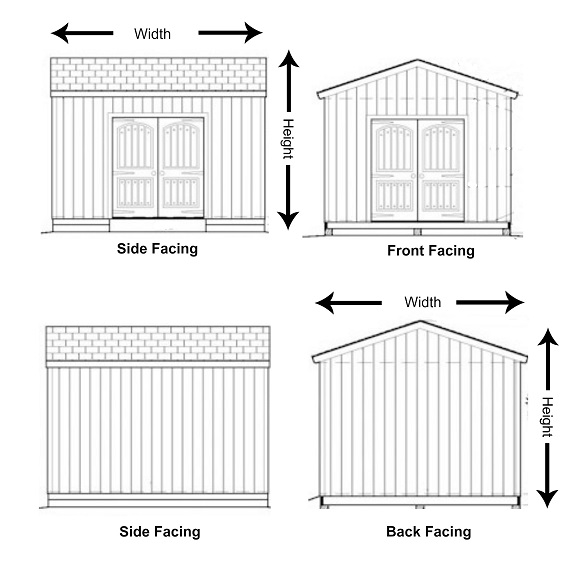
So what about the slightly more complicated stuff like sheds, log cabins or fence panels? Well the maths is the same really, you just have to work out the square meterage of each side.

Length x Width x Height = Area
For example a common sized garden shed is 6ft x 4ft. It has four panels comprising of two sides, plus a front and a back. The height of these shed panels from floor level to the base of the roof can vary but is more often than not around 6 feet. The first step is to measure the width of the front panel by the height which will look like this : 4 feet wide x 6 feet tall = 24 square feet. ‘ What about the triangular bit at the top of the shed sides?’ we hear you say, well let’s not complicate things, rounding things up slightly will mean that there is enough in the pot, and it’s better to have a little too much than not enough. This is the square footage for 1 of your shed panels, simply double that calculation to get the measurement for 2 sides i.e. 24 square feet x 2 = 48 square feet. It’s not worth calculating or subtracting the surface area of windows as in terms of the amount of product, it’s not going to be anymore than perhaps half a tea mug worth or less. Now for the front and back panels. These will be 6 feet wide by 6 feet tall = 36 square feet. Double that measurement to get the area of both side panels so 36 square feet x 2 = 72 square feet.
Quick recap…
- Front Panel: 6ft x 4ft = 24 feet square
- Back panel: 6ft x 4ft = 24 feet square
- Side Panel 1: 6ft x 6ft = 36 feet square
- Side Panel 2: 6ft x 6ft = 36 feet sqaure
So at this point all you need to do is add all the panel totals together to work out your shed total
24ft + 24ft + 36ft + 36ft = 120 square feet
See that was easy, wasn’t it, but we’re not quite finished yet, you need to input this calculation into the product calculator to work out how much of the product you actually need for the number of coats that you intend to apply, Sorted !!
These calculations will work for both interior and exterior projects in the same way so if it’s a two dimensional object like a wooden floor or table top its simply width x length. For three dimensional objects such as kitchen units or a bookcase, log cabin or garden shed, the principle is length x height x 2 + width x height x 2 = area.
All that’s left to point out is that although our coverage area calculators are super helpful and fairly accurate, they can’t predict if your wood is smooth or rough sawn, new or aged, pre-treated or untreated, weathered or un-weathered. These factors along with the unique characteristics of the tree that the timber came from can all have an effect on the absorption rate, coverage and colour of wood finishing products, that’s why we always recommend rounding up rather than down. After all, it’s far better to finish a job with a little spare than run out with just a patch to do. In terms of coloured wood finishing products, always do a small test area first, perhaps on the back or side of the shed and allow to dry fully before deciding if the colour is right for you.
Need our help?
For further information about wooden shed projects and finishes you can apply, contact our team of resident experts who are always on hand to help with project advice and product recommendations. Alternatively, see our shed treatments FAQ page which covers many of our most commonly asked questions.
We love to see before, during and after photos of any wood finishing project. If you would like to share your project pictures with us and our followers, you can either send us some photos or share on our Facebook, Twitter, Pinterest or Instagram pages.


