Judging by the response we received from last week’s blog post about hand crafted Valentines gifts, a fair number of you were inspired to give it a go and for those that haven’t started yet, and in case you needed a gentle reminder, Valentines Day is this Sunday. Time is running short so if you are going to make something, now’s the time to get busy.
Although time is running short, it doesn’t mean that there’s not enough time to create something that is both beautiful and personal, a gift that will be treasured for ever. And the good news is that this weeks offering is even more simple to make than last weeks. Interested? Lets get started.

If you prefer a video guide to this project, you’ll find one nearer the bottom of this article.
So as with last weeks project, we suggest using a piece of plank from an old pallet as it’s ideal for the project and free. Wooden pallets are a great source of free timber for all sorts of projects, big and small. Presuming your pallet has been dismantled, you’ll be left with a load of planks and wooden blocks, which we used for last weeks Valentines gift idea.
Cut the timber plank down to the required size then sand it smooth, firstly using p80 and then p120 grit sandpaper to get it ready for dying. Gently rounding off the edges with an electric sander or by hand gives the wooden plaque a softer, weathered look but its not essential as it’s just a question of taste. Drill two holes in the corners so that twine can be put through for hanging. Again this isn’t essential as it’ll look great free-standing on a shelf or mantlepiece.
Use Manns Classic Wood Dye in white and a Woodleys Disposable Foam Brush to apply the dye. Stir the wood dye thoroughly before and at regular intervals during application to ensure a consistent colour. Pour the dye into a paint tray or other container then apply liberally. finish off by working along the grain taking care to remove all excess from the surface of the timber with a clean, lint free cloth before leaving to dry for around an hour.
While the wooden plaque is drying make your stencil by finding a design you like and score it out on some thin plastic with a sharp craft or Stanley knife, for our example we’re doing alternating hearts to match the design we did on last weeks tealight holder.
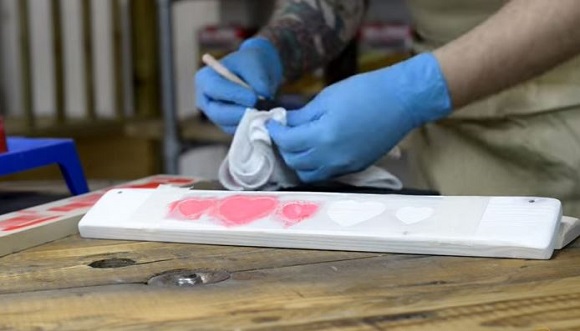
Next, just fix the stencil in place with some masking tape, we’ll be using the same Manns Water Based Dye in red that we used last week. Dip just the end of the Manns Disposable foam brush lightly in to the dye, blot off any excess on a microfibre cloth, then test it on another piece of wood to make sure not much is coming off. Apply to the stencilled area very carefully to avoid bleeding – work in from the edges applying just a tiny amount at a time.
Leave again to dry for an hour then carefully remove the stencil. Once fully dry give it a gentle rub down with a Woodleys Finishing Pad, then you’re ready to apply a topcoat.
For the top coat we’re using Morrells Nitrocellulose Spray Lacquer in High Gloss. As with any spray, always apply in a well ventilated area and wear a suitable mask too. For the sake of our video, we’ve applied the first coat in our shop and then moved outside to apply subsequent coats.
Firstly shake the can well, then from around 15cm spray the lacquer over it in short even bursts. Allow the lacquer spray to dry for around 20 minutes between coats under normal conditions. If spraying in cooler or damp conditions, these drying times may be extended.
It’s important that between coats you lightly denib with a fine or medium Manns Finishing Pad, this smooths out imperfections and aids adhesion of further coats. you should be doing around 5-8 coats for this project. So without further delay, here’s our video guide to producing another stunning Valentines gift.
Follow the steps above and your Valentines gift will go down a treat. As with last weeks project, let us know how you got on with your before, during and after photo’s.
If you’re unsure about anything covered in the above blog post or video, don’t be shy. Contact our team of dedicated experts who will happily answer any questions you may have. If you want a different colour or perhaps a wax or oiled finish, not a problem, we can advise on a wide range of alternative products that’ll give you the finish that you’re looking for.


